 As promised, I'm back with a vengeance. April has barely begun and hark, I already have a post for you! As a disclaimer, I apologize for my pictures on this one. The dough/cookies are actually bright green (!!!), but no matter how I photographed them, the color just simply wouldn't come through.
As I'm sure you know, there are many types of cooks out there. Just perusing through the plethora of food blogs out there on the Internet, I see everything from house wives wielding box mixes to food artists who have mastered presentation and photography of their baked goods (of which I will be forever envious), from over-the-top tacky combination of pies, cookies, AND cakes, to wonderfully simple yet decadent loveliness. What I'm trying to get at here is that every baker has their own style, and the cookbook I adapted this recipe from is no exception.
My sister gave me this cookbook as my graduation present a little over a year ago, and although its pictures are beautiful and its recipes are really good, I hate reading it. The woman who wrote it just seems so pretentious and like she takes herself (and these recipes) way too seriously. I mean, they're good, but geez, they're not unforgettable, such as the title of her book suggests. I guess that's just her "baking personality" though.
 But sometimes, I just like to get myself all riled up over something silly, so I read her intro to this recipe. As she's explaining what green tea powder (matcha) is, she says, "you will probably have to mail-order it unless you have a well-stocked tea purveyor near you". Has this woman ever heard of an Asian supermarket? Guess not.
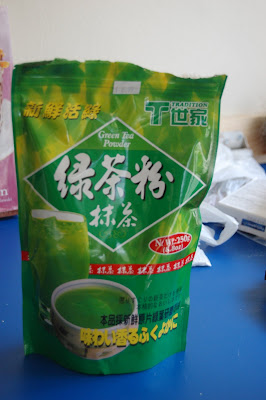
I got this at the local one (Chun Ching). It doesn't say Matcha Powder on it, but it's the same thing, and it's definitely cheaper here than at a health food store or a tea store! A tiny canister at the health food store here was about $25. This giant bag of it was only $7 at the Asian supermarket.

Anyway, hers turned out prettier than mine, but mine are vegan, so they're better :) Recipe, adapted from Dede Wilson's "Unforgettable Desserts" cookbook, is below!

Ingredients:
2 1/4 cup flour
1/4 tsp salt
2 sticks vegan butter
2 Tbsp green tea powder
1/2 cup sugar
Directions:
Sift flour and salt together in a bowl.
In another bowl, mix butter, green tea powder, and sugar together until fluffy and a uniform green color. Mix in flour mixture until a crumbly dough forms. The dough should come together when you press it with your hands.
Form the dough into a ball with your hands. Sprinkle your counter top with flour and roll the dough out to about 1/4 inch thickness. Use a cookie cutter to make as many cookies as you can with the dough. Place on a cookie sheet with parchment paper, then refrigerate for at least one hour.
Preheat oven to 325 degrees. Bake for about 15 to 17 minutes. Let cool, and then store on a plate or cookie jar. Devour!
 Yes, you heard right. Vegan ice cream smushed between two vegan cookies. I thought I would resume my regular posting with something outrageously awesome. You're about to get even more excited, because these aren't just vanilla ice cream with chocolate chip cookie sandwiches. This is three of the best flavors of all time put together into one dessert.

Check it: Banana ice cream with peanut butter chocolate chip cookies. It's a trifecta/love triangle/orgy of wonderful flavors! Also extremely easy to make!

You don't even need an ice cream maker to make this ice cream (although it speeds the process up just a tiny bit). All you need is a blender and a freezer. I'm at a loss for what to write, because I think these speak for themselves.

Recipe below!
Ingredients:
6 very ripe bananas
1 tsp agave nectar
1/2 cup vegan butter
1/2 cup peanut butter
1/2 cup sugar
1/2 cup brown sugar, packed
1/2 tsp vanilla extract
1 Tbsp apple cider vinegar
1/2 tsp baking powder
1/2 tsp baking soda
1 1/4 cup flour
6 oz. chocolate chips
Directions:
If using an ice cream maker: Peel all the bananas. Place in a bowl and mash until a somewhat smooth paste is formed. Refrigerate for about an hour. Then put in ice cream maker along with agave nectar and let it do its thing. Freeze when it's done.
If not using an ice cream maker: Peel the bananas and then break into four pieces each. Freeze thoroughly. Once frozen, put in a blender with about 1/4 cup almond milk and agave nectar. Blend until smooth, then store in freezer.
To make cookies: Cream butter, peanut butter, and sugars together until smooth. Add the vanilla extract and apple cider vinegar and mix in. In a small bowl, sift together flour, baking soda, and baking powder. Add dry mixture to wet mixture. Stir together, then stir in chocolate chips. Drop by Tablespoon-full onto an ungreased baking sheet, then flatten out with your hand. Bake at 325 for about 11 to 12 minutes. Let cool completely.
Once the cookies are completely cool, scoop about 1/4 cup of ice cream onto the flat side of one of the cookies, then slap another one on top. Store in the freezer in an airtight container.
 I'm finally back! It's been so long since I've been able to bake that I've felt all out of sorts lately. It didn't help that I was in the midst of moving (which took longer than expected, since I accidentally turned my utilities off at the old place too soon, so had only a couple hours a day between the end of work and sunset to continue transferring stuff from the old to the new place!). I'm also the kind of person who gets unpacked as soon as humanly possible, but it has taken me over a week to get started on unpacking since i slipped a disc in my back on New Year's Eve! So I laid helplessly in bed, not able to move at all, trying not to let the boxes stare back at me, refusing to listen to them mock my disorganization. This week has been the first that I can do anything after work besides crawl under the covers and take pain medication. So I mostly unpacked and got to work in the kitchen!
 Oh yes, this is the newest addition to our family, Luna. She's quite a character, but seems to be settling in with us just fine. She cuddles relentlessly, which was entertaining for me while bedridden.
 And here's the other kitten dozing on his new favorite blanket.
 Here's my new half-way unpacked kitchen.
 As you can see, I don't have much counter space at all, which drives me nuts! I'm going to have to create some on my own, but for now, this is what I have to work with.
 I emerged from the dungeon I work in to greet a uniformly slate-gray sky and gusts of chilly wind, and my first thought was, "gingersnap cookies and a glass of almond milk, with a book under my covers with the kitties cuddling with me sounds like the best sort of remedy for this day". So that's what I did. Recipe below.
Ingredients:
2 1/2 cups flour
1 tsp baking soda
1/2 tsp salt
2 1/2 tsp ginger
1/2 tsp cinnamon
1/2 tsp cardamom
1/2 tsp clove
3/4 cup vegetable oil
1/2 cup brown sugar (packed)
1/2 cup sugar
1/3 cup molasses
1/2 tsp vanilla extract
sugar for coating the cookies (about 1/2 cup)
Directions:
Preheat the oven to 350 degrees.
Sift together the dry ingredients in a medium bowl.
In another medium bowl, stir together all the wet ingredients with a fork. Add the dry ingredients to the wet, and stir to combine. The dough will be uniform in texture and will feel oily, but should stick together.
Scoop by rounded Tablespoon-fulls and roll the dough between your hands to create balls. Roll in a shallow bowl or plate of sugar. Coat completely and place on an ungreased baking sheet.
Bake in oven for about 15 minutes. Place on a cooling rack after you let them cool on pan for about five minutes. Once they are completely cool, they will be much stiffer than when they first came out of the oven, so expect a crunchy cookie when you bite into it!
Hope you all enjoy :)
 I have been dying to make these cookies for almost a week now. This past week has been one of the coldest I've ever been through in Florida. The house I live in is old and crappy and doesn't have central heating (or any heating, for that matter!) similar to many houses in Gainesville. And since I only have two space heaters that combined could only heat one room, I had to prioritize. This meant the bedroom was the only habitable room in my house for about a week. Not only was the kitchen just too darn cold to cook in (even with the oven and stove top on), it was way too messy to cook in as well. On top of there being no heat, there's also no hot water in the kitchen. During the summer, this was awesome since it cut down on my energy bill a lot! But when the high is 47 for the day, doing dishes in cold water in a house that is the same temperature inside as outside just was not an option.
Today was the first warm day since the cold streak, a high of 70!!! I gleefully rode my bike home scantily clad in a mere two sweatshirts and gloves instead of underneath about six layers of coats, and when I got home and saw the mound of dishes waiting for me in my semi-warm house, I almost teared up with relief. Finally, I could cook!
 This is a recipe I've been wanting to try for a while. They are not exactly savory cookies, but they're also not very sweet. They have a wonderful combination of flavors and are very simple to make.
 I got some inspiration for these cookies from 101 Cookbooks. If you've never seen it, check it out online. It's amazing. The pictures put mine to shame (although in my defense, I'm a novice!) and it has unusual yet tasty ideas. I adapted this recipe in order to make it vegan and I switched up the presentation to suit my tastes.
 These cookies provide a nice respite from the overly sweet Christmas cookies floating around this time of year. Recipe is below. Enjoy!
Ingredients:
2 cups flour
1 cup (2 sticks) vegan butter, room temperature
2/3 cup sugar
1 lemon's zest
1 1/4 tsp fresh rosemary, finely chopped
1/2 cup pine nuts
2 tsp olive oil
Directions:
Combine vegan butter and sugar in a medium bowl until well incorporated. Add zest and rosemary and stir to combine. Add flour and mix until a crumbly dough forms. The dough should look dry, but should hold together when pressed.
Tear a long sheet of wax paper and put on the counter. Gather the dough in your hands and press all of it into one ball. Put the ball of dough on the wax paper. Tear another sheet of wax paper the same length as the first and put over the dough ball. Press down to form a disk of dough. Put in refrigerator for about 20 minutes.
After dough has hardened a little bit, take out of the fridge and, with the wax paper still on both sides of it, use a rolling pin to flatten the dough to about 1/4 inch thickness. Use a cookie cutter to cut out shapes.
Preheat oven to 350 degrees.
Place the shapes on a greased baking sheet.
In a small bowl, combine pine nuts and olive oil so the pine nuts are coated in the oil. Scatter about 2 teaspoons of pine nuts onto each cookie. Arrange to your taste. Then press down slightly so they stick into the dough. Bake for 10-12 minutes, or until edges are slightly browned.
Continue with rest of dough until entirely used up. If the dough becomes sticky and hard to work with, just pop it in the freezer for five minutes and then continue.
Let cool on a cooling rack. Enjoy! (I enjoyed about four in one night...)
 Winter has finally arrived in Florida. I sit typing this under layers upon layers of clothing and blankets with a space heater nearby and am still shivering. Any northerners reading this may scoff, thinking, It's Florida, how bad can it be? But for those of us who are used to complaining about heat and humidity for eight months out of the year, a low of 25 (like tonight) sends us into a state of panic.
Anyway, I digress. I was talking about winter, which means that Christmas is peeking its head around the corner, and nothing brings back fond memories of Christmas like making sugar cookies. This is fairly convenient for two reasons: first, my boyfriend has been bugging me to make him sugar cookies that are NOT VEGAN. He said, Nothing fancy, and nothing for your blog; I just want some sugar cookies. But of course if I'm going to bake something, they're going on the blog :)
The second reason this recipe came at a convenient time is because the dough must be kept very cold through the process, and since my house is hardly weather-proof, the kitchen was definitely cold enough to keep the dough chilled, thus making my life easier! It's pretty much impossible to make these cookies in a hot kitchen (i.e. an un-air conditioned kitchen in Florida during the summer).
Now, I know that owls aren't necessarily indicative of the holiday spirit, but I am somewhat of a Grinch when it comes to Yuletide joy, so forgive me.
 This is an owl-in-progress shot. I used a drinking glass to cut out the bigger circles and then an old 7-Up bottle cap to make the holes for the eyes.
 Make sure to reserve the eyes so you can fill in the holes of the other colored dough.
 Here they are out of the oven. They come out looking a little creepy! Could possibly be decorated for a good Halloween party or even an anime thing.
 Just making room on the cooling rack for the second batch.
 Here's one of them finished, along with the assembly line for the others! These turned out pretty cute, with lots of decorating possibilities. They're pretty tasty, and retain their softness and moisture pretty well. Nothing like the slice and bake from Pillsbury, although quite a bit more work! But I think it's worth it. Recipe below.
Ingredients:
2 1/2 cups flour, divided
1/2 cup cocoa powder
1/4 tsp salt, divided
2/4 tsp baking powder, divided
1 cup sugar, divided
1 cup unsalted butter (2 sticks), softened
1 egg
1 Tbsp milk, divided
1/2 tsp vanilla extract
1/2 tsp coconut extract
Directions:
You will need four mixing bowls, two small and two medium, wax paper, and two different sized circles for cutting the dough, one for the cookie size and one for the eyes.
In one of the small bowls, sift together 1 1/2 cups flour, pinch of salt, and 3/8 tsp baking powder (a little less than 1/2 tsp).
In the other small bowl, sift together 1 cup flour, 1/2 cup cocoa powder, pinch of salt, and 3/8 tsp baking powder.
In one medium bowl, beat 1/2 cup butter and 1/2 cup sugar together until smooth. Do the same in the other medium bowl.
In a small bowl, crack the egg into it and then whisk well with fork or whisk. Pour half of the egg into each medium bowl. Then pour 1 1/2 tsp milk into each of the bowls. Into one bowl, pour the vanilla extract. Into the other, pour the coconut extract. Make sure you remember which bowl has what extract. Mix each bowl separately until contents of each bowl are well incorporated.
Pour the non-chocolate flour mixture into the bowl with the coconut extract, and mix well until a the flour mixture is incorporated. The dough will look crumbly, but will stick together when you press it together. Pour the chocolate flour mixture into the bowl with the vanilla extract, and repeat the process of mixing.
Tear off four sheets of wax paper so that they are about square shaped and lay them on the counter. Grab one of the doughs and form into a ball with your hands. Place on one wax paper square and then flatten. Put another wax paper square on top of that one. Set aside.
Do the same thing with the other dough. Place both doughs in the refrigerator for at least two hours, or overnight, to chill enough so that the dough is hard.
When you are ready to continue, pull one of the doughs out of the refrigerator and, with the wax paper still on top and below the dough, use a rolling pin to flatten the dough into about a 1/4" thick sheet of dough. Take the top wax paper off of the dough. Use your big circle cookie cutter to cut out as many circles as you can. (You may want to dip the rim of the cookie cutter in flour so it won't stick to the sides, as this dough gets very sticky when it gets warmer.) When you have gotten as many circles as you can out of that sheet of dough, roll it into a ball again, flatten, and replace the top sheet of wax paper. Roll out again and repeat the process. Repeat this until there is not enough dough to make another circle. Discard (or snack on) the leftover dough.
Put the circles of dough back on the wax paper. Now use your smaller circle cookie cutter to cut out two eyes in each of the bigger circles. You may want to flour the rim of this cookie cutter as well. I had trouble getting mine out of the bottle cap, so I used a fondue sticker to get it out. You can also use a fork prong or a toothpick to help you out with this.
Once you have cut out all the eyes, place all the circles, big and small, back onto the wax paper and put back into the fridge to keep chilled.
Then repeat with other dough.
Preheat your oven to 375 degrees. Get out a cookie sheet and grease it, or lay down parchment paper. Grab all the circles from the fridge, and place big circles on the cookie sheet, making sure they are about an inch apart from each other and the sides of the cookie sheet. I could fit about six onto one cookie sheet at a time. Place small circles of opposite colored dough into the holes of the big circles on the cookie sheet.
Bake for about 9 to 10 minutes, or until the edges are just beginning to brown. Be sure to keep a close eye on the chocolate ones, as the browning of the edges will not be apparent. For this reason, you might want to bake chocolate ones with vanilla ones so you can tell when they're ready.
Take out of oven and let cool for about two minutes. Then transfer to cooling rack to let cool completely.
To ice these, I used some mess-up frosting from my chocolate beet cupcakes. The recipe is here
To decorate, make two angled lines above the "eyes" of the cookies. Then cover with shredded coconut. Then make two dots for eyes, and an upside down triangle for a nose. And you're done!
I'm not sure I know anyone who can resist a chocolate chip cookie coming right out of the oven. There are so many variations to them, and everyone has their own tastes. There's chewy, crunchy, sparse chocolate, mostly chocolate, thin, thick, with nuts and without. The list could go on.
These cookies are of the chewy variety, and since I like a little more texture than just the chips, but am not a huge fan of nuts in cookies, I add oatmeal. This is a very adaptable recipe for all types of cookie fans, and I'll let you know where you can vary the ingredients to suit your cookie tastes.
Here's the ingredients that I used.
 I like to use butter-flavored vegetable shortening rather than vegan butters because this makes the cookies stay softer over time. I also make sure the banana has a lot of brown spots so the flavor is sweeter and it's easier to mash up. When all the ingredients are mixed together, it looks a little like this:
 Then line them up in a row...
 And wait for the first batch to be done so you can put the other batch in...
 And they come out looking gorgeous!
 And as an aside, I have a slight obsession with owl trinkets. They're all over my house, and I like to show them off, so most of my baked goods will be featured alongside an owl just for kicks. The recipe for these cookies, along with variations, is below. Enjoy!
 Vegan Chocolate Chip Oatmeal Cookies:
Ingredients:
- 3 cups all purpose flour
- 1 tsp salt
- 1 tsp baking soda
- 1/2 cup (1 stick) vegetable shortening
- 1 cup brown sugar
- 1/2 cup sugar
- 1 very ripe banana
- 1/2 tsp vanilla
- 1 1/2 cups semi-sweet chips
- 1 1/2 cups old fashioned oats
Directions:
Preheat oven to 350 degrees.
In a medium-sized bowl, sift flour, salt, and baking soda together. Set aside.
In a large bowl, combine shortening, brown sugar, sugar, banana and vanilla. Beat with an electric mixer or a fork until smooth.
Pour half of the flour mixture into the sugar mixture. Mix until combined. Pour the remaining half of the flour mixture into the sugar mixture and mix until combined. Mix in chocolate chips and oatmeal.
Place by rounded Tablespoons onto ungreased baking sheet and bake for 10-12 minutes, or until very lightly browned. These cookies don't spread out a lot, so be sure not to overcook them waiting for them to flatten.
Variations:
If you like your cookies to be crunchy instead of chewy, then substitute a vegan butter for the shortening (such as Earth Balance) and the brown sugar with plain sugar. If you use Earth Balance, you should cut the salt down to 1/2 a teaspoon since their butter is pre-salted. When you lay them out onto the baking sheet, then press them down so they are flat. This way, they will be thinner when you take them out and eating them won't feel oppressive.
If you like less chocolate, or would like to add nuts, then either use only one cup chocolate chips, or use one cup chocolate chips and one cup nuts.
If you would like a healthier version of these cookies, you can substitute dried fruit (such as raisins or dried cranberries or dried blueberries) for the chocolate chips. Use the same amount.
I hope you enjoy this recipe! It's one i come back to over and over again. Comments and questions are always appreciated.


